One of the things I have made that people seem to really like are these durable, mini dry erase boards, so I figured I would put up with a tutorial with step by step instructions and pictures so you can make your own. This idea came from two ideas: the dry erase calendars floating all around Pinterest where I learned that glass is dry erasable, and a friend (who is also a teacher) commenting that she wouldn't hang picture frames in her class because they can shatter so easily. One day, while getting lost at Lowe's, I found these different sized pieces of plastic sheeting. The smallest size is 8x10, which is the one I get, and it costs about $2 a piece. The go up greatly in size, with the prices for each piece increasing too. The best part of this product (besides that its inexpensive) is that its durable! I beat one against my table a few times, and nothing. Not even a scratch! So I feel comfortable bringing this into my classroom, or giving them as teacher gifts, etc.
Materials needed:
8x10 size plastic sheeting
12x12 piece of scrapbook paper (thin paper works better than cardstock)
Modge podge
Paint brush for modge podge (I catch the foam brushes on sale for 5/10 cents a piece so I can throw them away when I feel lazy)
Glitter (if desired)
Craft knife and cutting mat
Hot glue and hot glue gun
Ribbon or magnets (your choice)
So let's get started! They come with a protective film on both sides, so I just peel both sides off:
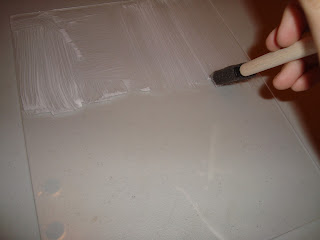
On one side, I spread a thin layer of modge podge:
Then you lay the paper face down on the modge podge and smooth it out. I let it dry for about a minute, and then turn it over. You will be able to see the pattern through the plastic:
The next step is to trim the excess with a craft knife:
This next step is optional. I like to put a glitter trim around the edges of the dry erase board. I free hand it using the same foam brush and modge podge. I do one side at a time. A friend at the last craft night suggested I could use double stick tape on the edges and then glitter it, which would certainly make it more precise and potentially easier. But, I didn't have double stick tape, so I used modge podge:
Almost done. I cut two pieces of ribbon. One will become a loop and then other a ribbon to hang the dry erase board. I hot glue the loop down first, and then the ribbon on top:
And voila! An alternative to hanging it with a bow would be to add magnets to the back so you can stick it to a file cabinet, or just leave it with no magnets or bow if you just want to leave it on or in a desk.
Here are my original ones:
So there you go. Super easy, takes about 10-15 minutes start to finish, and very inexpensive. Accounting for all materials used, it cost me about $3.25.
I'd love to hear about and see any of your ideas for that plastic sheeting, so please share! Good luck and happy crafting!


No comments:
Post a Comment